Phần I: Cài trên ubuntu desktop (máy sẽ hiển thị màn hình theo dõi)
Chuẩn bị và cài đặt các gói theo yêu cầu
Chú ý: khi các bạn copy và paste lệnh nhớ chú ý kĩ, đôi khi máy sẽ hiểu nhầm kí tự xuống dòng là Enter và máy sẽ cài sai, thiếu gói,….
LAMP là bộ cài đặt bắt buộc phải có, cài đặt theo lệnh sau:
sudo apt-get install apache2 php5 libapache2-mod-php5 mysql-server libapache2-mod-auth-mysql php5-mysql phpmyadmin libgd2-xpm-dev
Cài đặt Nagios 4
Tạo Nagios User và Group
Bạn phải tạo user và group cho Nagios process. Tạo một user “nagios” và nhóm “nagcmd” :
sudo useradd nagios
sudo groupadd nagcmd
sudo usermod -a -G nagcmd nagios
Install Build Dependencies
Vì cài Nagios từ source nên chúng ta phair cài một vài thư viện, mà ở những thư viện đó sẽ giúp chúng ta hoàn thành việc cài đặt . Chúng ta sẽ cài gói apache2-utils, gói ngày sẽ giúp chúng ta về phần giao diện quản lý Nagios.
First, update your apt-get package lists:
Bây giờ mọi thứ đã sẵn sàng, chúng ta sẽ bắt đầu cài.
Cài đặt Nagios Core
Tải Nagios mới nhất về máy, bạn có thể truy cập vào đây Nagios downloads page, và click Skip to download link phía dưới biểu mẫu. Copy đường dẫn và dán vào câu lệnh phía dưới để tải về hoặc có thể dùng trực tiếp bằng lệnh bên dưới.
Lệnh này sẽ tải Nagios 4.1.1 về thư mục home của người dùng:
cd ~
curl -L -O https://assets.nagios.com/downloads/nagioscore/releases/nagios-4.1.1.tar.gz
Giải nén với lệnh:
Di chuyển vào thư mục Nagios:
Cài postfix trước khi cấu hình (sudo apt-get install postfix), Thêm –with-
mail=/usr/sbin/sendmail theo câu lênh:
và thêm --with-mail=/usr/sbin/sendmail như câu lệnh phía dưới:
Bây giờ biên dịch Nagios với câu lệnh:
Bây giờ chúng ta sẽ chạy lệnh make và cài Nagios, init scripts, file cấu hình mẫu:
Thêm người dùng cấu hình Nagios thông qua giao diện web
Cài Nagios Plugins
Download và giải nén:
cd ~
curl -L -O http://nagios-plugins.org/download/nagios-plugins-2.1.1.tar.gz
Giải nén:
Chuyển vào thư mục:
Cấu hình yêu cầu thực thi:
Biên dịch và cài đặt:
Cài NRPE
Download và giải nén
Chuyển thư mục:
Cấu hình yêu cầu thực thi::
Lưu ý nếu dùng ubuntu 32bit thay bằng: –with-ssl-lib=/usr/lib/i386-linux-gnu
Biên dịch và cài đặt:
Thêm IP Ngios Core server vào file xinetd :
only_from = 127.0.0.1 192.168.0.108
=>only_from = 127.0.0.1 192.168.0.108 (dia chi cua manage/ubuntu desktop)
Lưu lại và thoát ra.
Khởi động lại dịch vụ xinetd để khởi động NRPE:
Cấu hình Nagios
Mở chức năng cho phép Nagios Server truy cập file cấu hình
sudo vi /usr/local/nagios/etc/nagios.cfg
Tìm và bỏ dấu #:
#cfg_dir=/usr/local/nagios/etc/servers==> cfg_dir=/usr/local/nagios/etc/servers
Lưu và thoát.
Kiểm tra xem đã có thư mục (nêu không tạo thư mục server):
sudo mkdir /usr/local/nagios/etc/servers
Thay đổi email nhận cảnh báo
sudo vi /usr/local/nagios/etc/objects/contacts.cfg
Tìm và thay đổi email như bên dưới:
email nagios@localhost ; <<***** CHANGE THIS TO YOUR EMAIL ADDRESS ******
Lưu và thoát.
Cấu hình và cài đặt các dịch vụ NRPE, phải thêm vào file:
Thêm vào cuối file nội dung bên dưới:
define command{
        command_name check_nrpe
        command_line $USER1$/check_nrpe -H $HOSTADDRESS$ -c $ARG1$
}
Save and exit. This allows you to use the check_nrpe command in your Nagios service definitions.
Cấu hình Apache
Kích hoạt Apache rewrite và cgi modules:
sudo a2enmod rewrite
sudo a2enmod cgi
Sử dụng htpasswd để tạo admin user, gọi là “nagiosadmin”, => dùng để truy cập vào giao diện web Nagios:
sudo htpasswd -c /usr/local/nagios/etc/htpasswd.users nagiosadmin
Nhập và nhớ mật khẩu để dùng cho sao này nhé.
Note: If you create a user that is not named “nagiosadmin”, you will need to edit /usr/local/nagios/etc/cgi.cfg and change all the “nagiosadmin” references to the user you created.
Tạo liên kết web Nagios nagios.conf đến thư mục sites-enabled :
sudo ln -s /etc/apache2/sites-available/nagios.conf /etc/apache2/sites-enabled/
Nagios đã sẵn sàng và ta sẽ khởi động lại Apache:
sudo service nagios start
sudo service apache2 restart
Tự động khởi động dịch vụ Nagios khi restart máy:
sudo ln -s /etc/init.d/nagios /etc/rcS.d/S99nagiosHạn chế truy cập Nagios server, chỉnh sửa file Apache cfg:
sudo vi /etc/apache2/sites-available/nagios.conf
Tìm và thêm dấu # ở dòng đầu:
Order allow,deny
Allow from all
thành
#Order allow,deny#Allow from all
Bỏ # trước hai dòng trong file cấu hình và thêm IP truy cập Nagios Web:
Lưu ý: Allow from [Địa chỉ mạng của máy sẽ truy cập vào]
#  Order deny,allow
#  Deny from all
#  Allow from 127.0.0.1 192.168.0.0/24
thành
Order deny,allow
Deny from all
llow from 127.0.0.1 192.168.0.0/24
(Phải thay 2 chổ nhé)
Lưu và thoát.
Khởi động lại dịch vụ:
sudo service nagios restart
sudo service apache2 restartTruy cập giao diện Web Nagios
Kiểm tra truy cập vào web, bẳng trình duyệt:
http://nagios_server_public_ip/nagios
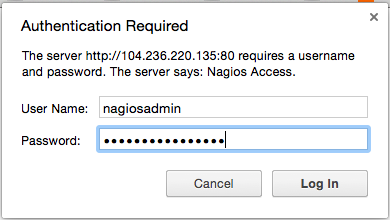
Nhập tên người dùng là nagiosadmin và mật khẩu đã thiết lập trước đó:
Phần II: Monitor a Host with NRPE (thực hiện trên máy Ubuntu server – là máy sẽ bị giám sát)
Cập nhật các gói cần thiết
sudo apt-get update
Cài Nagios Plugins và NRPE:
sudo apt-get install nagios-plugins nagios-nrpe-server
Cấu hình Allowed Hosts
Now, let’s update the NRPE configuration file. Open it in your favorite editor (we’re using vi):
sudo vi /etc/nagios/nrpe.cfg
Tìm dòng allowed_hosts và server_addressthêm địa chỉ ( địa chỉ ip của ubuntu desktop vào allowed_hosts và địa chỉ của ubuntu server vào server_address) :
allowed_hosts=[dia chi may manage - ubuntu desktop]
server_address=[dia chi ip administrator - ubuntu server]
Lưu và thoát.
Cấu hình Allowed NRPE Commands
Cấu hình giám sát đĩa, xem kết quả hiển thi, thay thế vào câu lệnh check disk (phần màu vàng):
df -h /sudo vi /etc/nagios/nrpe.cfg
Chỉ cần chỉnh ở những dòng sau (nếu đã chỉnh server_address và allowed_hosts ở trên thì chỉ cần chỉnh khu vực màu vàng ở dòng thứ 3 thôi):
- server_address: Set to the private IP address of this host
- allowed_hosts: Set to the private IP address of your Nagios server
- command[check_hda1]: Change
/dev/sdato whatever your root filesystem is called
The three aforementioned lines should look like this (substitute the appropriate values):
server_address=client_private_IP
allowed_hosts=nagios_server_private_IP
command[check_hda1]=/usr/lib/nagios/plugins/check_disk -w 20% -c 10% -p /dev/sda
Khởi động lại nrpe
sudo service nagios-nrpe-server restart
Cấu hình tường lửa UFW
ufw allow from [dia chi ubuntu desktop] to any port 5666 proto tcp
Kiểm tra client đã mở dịch vụ nrpe
sudo netstat –at | grep nrpe
Lưu và thoát.
Khởi động lại nrpe
sudo service nagios-nrpe-server restartKiểm tra liên lạc giữa Manage và Agent
Trên máy Ubuntu Desktop
cd /usr/local/nagios/libexec/
./check_nrpe -H <client_IP>
./check_nrpe -H [dia chi ubuntu server]
==>Nếu thấy kết quả: NRPE V2.15 là ok
Thêm Host vào Nagios Configuration
Trên Nagios server, tạo file mới nếu chưa có /usr/local/nagios/etc/servers/. Thay thế “yourhost“với tên host bạn muốn đặt
sudo vi /usr/local/nagios/etc/servers/yourhost.cfg
Thêm host vào để giám sát, thay đổi host_name bằng tên host của bạn(ví dụ “khoahnd1996” ), alias là phần mô tả host của bạn, và địa chỉ address là ip của ubuntu server:
define host {
        use                             linux-server
        host_name                       yourhost
        alias                           My first Apache server
        address                         [ip cua ubuntu server]
        max_check_attempts              5
        check_period                    24x7
        notification_interval           30
        notification_period             24x7
}
Ping:
define service {
        use                             generic-service
        host_name                       yourhost
        service_description             PING
        check_command                   check_ping!100.0,20%!500.0,60%
}
SSH (notifications_enabled set to 0 disables notifications for a service):
define service {
        use                             generic-service
        host_name                       yourhost
        service_description             SSH
        check_command                   check_ssh
        notifications_enabled           0
}
# kiểm tra dịch vụ web http
define service{
                                          use                               generic-service
                                          host_name                         client
                                          service_description               HTTP
                                          check_command                     check_http
}
# kiểm tra Ram
define service{
                                          use                               generic-service
                                          host_name                         client
                                          service_description               RAM
                                          check_command                     check_nrpe!check_memory
}
# kiểm tra user
define service {
                                           use                              generic-service
                                           host_name                        client
                                           service_description              Current Users
                                           check_command                    check_nrpe!check_users


}
10# kiểm tra tải
define service {
                                           use                              generic-service
                                           host_name                        client
                                           service_description              Current Load
                                           check_command                    check_nrpe!check_load

}
# kiểm tra đĩa cứng
define service {
                                            use                             generic-service
                                            host_name                       client
                                            service_description             Root Partition
                                            check_command                   check_nrpe!check_hda1

}
# kiểm tra số lượng tiến trình
define service {
                                            use                              generic-service
                                            host_name                        client
                                            service_description              Total Processes
                                            check_command                    check_nrpe!check_total_procs

}
# kiểm tra swap
define service{
                                            use                              generic-service
                                            host_name                        client
                                           service_description               Swap
                                          check_command                      check_nrpe!check_swap
}
Lưu và thoát. Sau đó tải lại dịch vụ nagios.
sudo service nagios reload
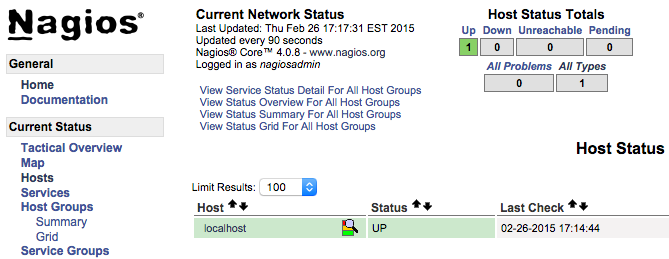
Kết quả:
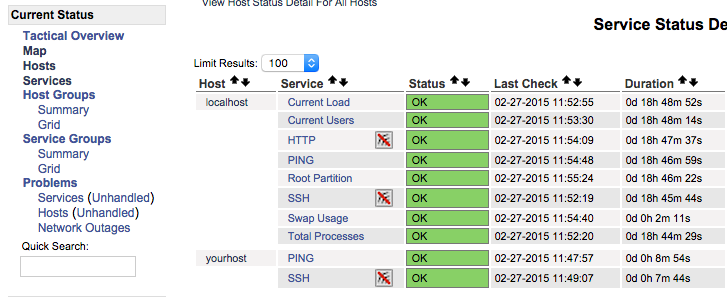
Good luck!


